Mastering the Art of Hard-Boiled Eggs: Your Ultimate Guide to Perfection
Few kitchen tasks seem as straightforward as boiling an egg, yet achieving that elusive balance of tender, non-rubbery whites and perfectly creamy yolks can feel like a culinary quest. If you've ever wrestled with eggs that peel away in frustrating chunks, revealed a dry, crumbly, or even green-tinted yolk, or ended up with whites so tough they bounce, you're not alone. Many home cooks struggle to consistently cook perfect hard boiled eggs every time. But what if we told you there's a simple, foolproof method that promises flawless results – easy-to-peel shells and a delightful texture from edge to center?
This comprehensive guide is designed to demystify the process, turning hard-boiled egg frustration into consistent success. We'll delve into the science behind common mistakes, offer expert tips on selecting the best eggs, and provide a detailed, step-by-step method that guarantees perfectly cooked, easy-to-peel hard-boiled eggs every single time. Get ready to elevate your breakfast, salads, and deviled egg game!
The Science Behind the Struggle: Why Hard-Boiled Eggs Are Tricky
Understanding why hard-boiled eggs often go wrong is the first step toward cooking them right. It boils down to temperature and the different cooking properties of egg whites and yolks. Eggs cook from the outside in, and their components react differently to heat:
- Egg Whites: The proteins in egg whites coagulate and set around 180°F (80°C). If they cook much hotter or for too long, their protein structure tightens excessively, leading to that unappetizing rubbery texture.
- Egg Yolks: Yolks are more delicate, achieving a creamy, set texture between 158°F (70°C) and 170°F (75°C). Exceeding this temperature range causes them to become dry, crumbly, and often gives rise to the infamous greenish-gray ring around the yolk's exterior. This discoloration is due to a chemical reaction between sulfur in the egg white and iron in the yolk, forming ferrous sulfide when overcooked.
The core challenge is that you can't precisely measure the internal temperature of an egg while it's cooking in its shell. Furthermore, a significant temperature difference between the egg and its cooking water can lead to uneven cooking, where the outside of the white overcooks before the yolk reaches its ideal consistency. This scientific insight forms the foundation of our perfected method, ensuring both components reach their optimal state without compromise.
The Quest for Perfection: Our Goal for Flawless Eggs
Many chefs and home cooks have experimented with countless techniques, often yielding conflicting advice. Our goal, refined through extensive testing, is to provide a method that consistently delivers:
- Soft, Set Whites: Firm enough to hold their shape, but tender and never rubbery.
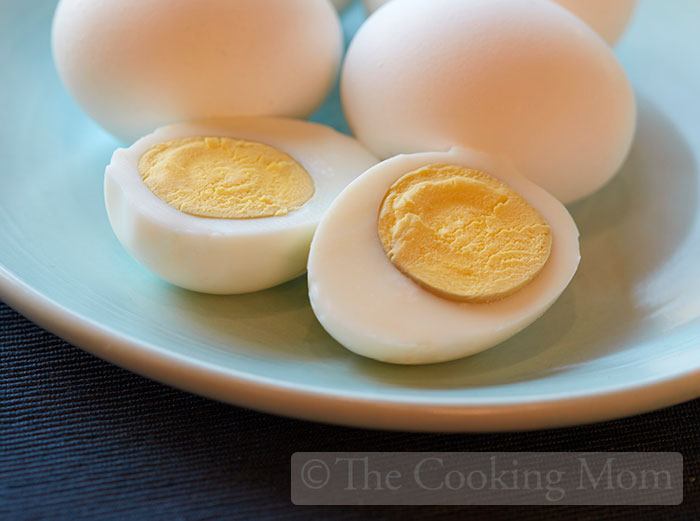
- Smooth, Creamy Yolks: Moist, vibrant yellow, and free from any dry, crumbly texture or green tinge.
- Effortless Peeling: The shells slide off easily, leaving a pristine egg white, perfect for deviled eggs or any presentation.
- Time-Efficiency: A straightforward process that doesn't demand constant hovering or complex equipment – just a pot, a lid, water, eggs, and ice.
This refined approach ensures that anyone can learn how to cook perfect hard boiled eggs every time, transforming a frustrating kitchen task into a consistently rewarding one.
Selecting the Best Eggs for Boiling
While the cooking method is paramount, starting with the right eggs can enhance your results. Here's what to consider:
Freshness Matters (Mostly)
- For Taste and Appearance: Fresh eggs, whether from your backyard flock or the grocery store, generally have a superior flavor and a tighter, more centered yolk. This is ideal for dishes where visual appeal matters, such as sliced eggs for salads or a classic egg Benedict. Their whites and yolks hold their shape beautifully.
- The Peeling Debate: While some sources suggest older eggs are easier to peel because the air cell at the blunt end expands and separates the membrane from the shell, our method aims to make *any* egg easy to peel. We've found that proper cooking and rapid cooling are far more influential on peel-ability than age.
Egg Type and Size
You can hard-boil almost any type of egg! Chicken eggs are most common, but don't hesitate to try duck, quail, or turkey eggs if you have access to them. The color of the shell (brown or white) makes absolutely no difference to the taste, texture, or cooking process. Just remember that larger eggs, like jumbo chicken eggs or duck eggs, may require a minute or two more cooking time than standard large chicken eggs to achieve the desired yolk consistency.
How to Cook Perfect Hard-Boiled Eggs Every Time: The 7-Step Method
Follow these precise steps for perfectly tender whites, creamy yolks, and shells that practically slide right off.
Step 1: Choose and Prepare Your Eggs
Start with eggs that are not ice-cold from the refrigerator. If possible, let them sit on the counter for 15-30 minutes to come closer to room temperature. This minimizes the temperature shock when they hit the water, reducing the risk of cracking and promoting more even cooking.
Step 2: Place Eggs in a Pot and Cover with Cold Water
Gently arrange your eggs in a single layer at the bottom of a heavy-bottomed saucepan. Avoid crowding, as this can lead to uneven cooking and cracks. Cover the eggs with cold tap water by at least one inch. Adding a pinch of salt to the water is an old trick some believe helps with peeling or prevents cracks, though its scientific impact is often debated, it certainly doesn't hurt!
Step 3: Bring to a Rolling Boil
Place the pot over high heat and bring the water to a rapid, rolling boil. You'll see plenty of vigorous bubbling. Do not cover the pot during this initial heating phase.
Step 4: Remove from Heat and Let Stand (The Key to Creamy Yolks!)
As soon as the water reaches a full rolling boil, immediately remove the pot from the heat. Cover it tightly with a lid. This is where the magic happens! The residual heat in the water will gently cook the eggs without exposing them to extreme, prolonged temperatures that cause rubbery whites and green yolks. The precise timing here is crucial for your desired yolk consistency:
- For Soft-Boiled (just-set whites, very runny yolks): 4-6 minutes
- For Medium-Boiled (set whites, slightly jammy yolks): 7-9 minutes
- For Perfectly Hard-Boiled (set whites, creamy, fully cooked yolks): 10-12 minutes
For large chicken eggs, 10 minutes is often the sweet spot for a creamy, well-cooked yolk without any green tinge.
Step 5: The Essential Ice Bath
As soon as the standing time is up, immediately transfer the eggs to a large bowl filled with ice water. Use a slotted spoon to avoid breaking the delicate shells. Let them sit in the ice bath for at least 5-10 minutes, or until completely cooled. This rapid cooling halts the cooking process, preventing overcooking, and causes the egg to contract, creating a slight gap between the cooked egg and the shell membrane, which is vital for easy peeling.
Step 6: Effortless Peeling Technique
Once cooled, gently tap each egg on a hard surface to create small cracks all over the shell. Then, roll the egg between your palms or on the counter to further loosen the shell. Begin peeling from the wider, blunt end, where the air pocket is located. Peeling under cool running water can help wash away small shell fragments and assist in separating the membrane from the egg white, making the process incredibly smooth and leaving you with beautiful, unblemished eggs.
Step 7: Enjoy or Store Properly
Your perfectly hard-boiled eggs are now ready to be enjoyed! Slice them for salads, mash them for egg salad, transform them into deviled eggs, or simply eat them as a healthy snack. If not consuming immediately, store peeled hard-boiled eggs in an airtight container in the refrigerator for up to one week. Unpeeled hard-boiled eggs can also be stored in the refrigerator for the same duration.
Troubleshooting Common Hard-Boiled Egg Problems
- Rubbery Whites: You cooked them too long, or at too high a temperature. Reduce your standing time or ensure you remove the pot from the heat promptly after boiling.
- Dry, Crumbly, or Green Yolks: Another sign of overcooking. The green ring is ferrous sulfide, a harmless but unappealing compound. Again, shorten your standing time or ensure immediate ice bath immersion.
- Difficult Peeling: This is often due to either very fresh eggs (which bond more tightly to the shell membrane) or insufficient cooling. Ensure a full, immediate ice bath after cooking. Our method aims to mitigate this, but if it persists, ensure you're using the crack-and-roll technique effectively.
- Cracked Shells During Cooking: Placing cold eggs directly into boiling water can sometimes cause cracking. Bringing eggs to room temperature first or starting them in cold water (as our method recommends) helps prevent this.
Conclusion
Cooking perfect hard-boiled eggs doesn't have to be a gamble. By understanding the simple science behind egg coagulation and following our precise, temperature-controlled method, you can consistently achieve that ideal balance of tender whites, creamy yolks, and effortless peeling. No more green rings, no more rubbery textures, and certainly no more wrestling with stubborn shells. Embrace this technique, and you'll find yourself reaching for these versatile culinary staples more often, confident in your ability to cook perfect hard boiled eggs every time. Happy cooking!
