Unlock the Secret to Perfect Hard-Boiled Eggs Every Time
Ah, the humble hard-boiled egg. It seems so simple, yet achieving that elusive balance of tender, non-rubbery whites and perfectly creamy, non-crumbly yolks can feel like a culinary mystery. Many of us have faced the disappointment: eggs with whites welded to the shell, yolks that are either still gooey or sport an unappetizing green ring, and a texture that's anything but enjoyable. If you've ever struggled to master the art of how to cook perfect hard boiled eggs every time, you're not alone.
The good news? It doesn't have to be a guessing game. The secret lies in understanding a bit of science and following a precise, straightforward method. Forget the cracked shells, the stubborn peels, and the overcooked centers. This comprehensive guide will equip you with the knowledge and steps to consistently produce hard-boiled eggs that are a joy to eat and a breeze to prepare.
Why Hard-Boiled Eggs Are Tricker Than They Seem
The main reason hard-boiled eggs often go awry stems from a fundamental difference in how their components cook. An egg isn't a single, uniform substance. It's a marvel of two distinct parts – the white and the yolk – each with its own ideal cooking temperature. The egg white, primarily protein, coagulates and sets around 180°F (80°C). Exceed this temperature significantly, and you're left with that firm, rubbery texture that can detract from any dish. The yolk, on the other hand, prefers a gentler heat, reaching its creamy peak between 158°F (70°C) and 170°F (75°C).
If the yolk cooks beyond this range, it begins to dry out, becoming crumbly. Even worse, if it's overcooked for too long or at too high a temperature, the hydrogen sulfide from the egg white reacts with iron in the yolk, creating ferrous sulfide. This manifests as that distinct, unappealing greenish-grey ring around the yolk, a sure sign of overcooking. The challenge, of course, is that you can't insert a thermometer into a cooking egg to monitor its internal temperature. Furthermore, the greater the temperature differential between the egg and its cooking water, the more uneven the cooking can be, leading to a perfectly cooked exterior but an undercooked or overcooked interior.
This intricate dance of temperatures and reactions highlights why a carefully calibrated method, rather than just throwing eggs into boiling water, is essential for truly perfect results. Our goal is to conquer these challenges and simplify the process, ensuring you always know how to cook perfect hard boiled eggs every time.
Choosing the Best Eggs for Hard Boiling
While the cooking method is paramount, starting with the right ingredients certainly helps. When it comes to hard-boiled eggs, here's what to consider:
- Freshness Matters (for appearance): If you're lucky enough to have access to farm-fresh eggs, use them! Fresh eggs tend to have tighter whites and yolks that hold their shape beautifully in the center of the egg, creating an aesthetically pleasing slice. This is particularly desirable for deviled eggs or salads where presentation is key.
- Older Eggs (for easier peeling): Counter-intuitively, older eggs (but still within their expiration date, of course) sometimes peel more easily. As an egg ages, the pH of the white increases, and the air pocket inside the shell expands, making the membrane less prone to sticking to the cooked white. So, if peeling ease is your absolute top priority and presentation is secondary, slightly older grocery store eggs might actually be your friend. However, with our method, peeling will become a breeze regardless of age.
- Egg Size: Most recipes, including this one, assume large chicken eggs. If you're using medium, extra-large, or even jumbo eggs, you may need to adjust the cooking time by a minute or two in either direction. For other types of eggs like duck, quail, or turkey eggs, consult specific cooking guides, as their size and yolk-to-white ratio will significantly alter cooking times.
- Shell Color: Brown or white, it makes no difference to the taste or cooking process. Choose what's available or what you prefer!
The Foolproof Method: How to Cook Perfect Hard-Boiled Eggs Every Time
After much experimentation and learning from culinary experts, we've distilled the process down to these simple, yet highly effective steps. This method ensures soft, firm whites, creamy, bright yellow yolks, and shells that practically slide off.
Step 1: Start with Room Temperature Eggs
Remove your eggs from the refrigerator about 15-30 minutes before you plan to cook them. This gradual temperature equalization helps prevent cracking when they hit the hot water and promotes more even cooking.
Step 2: Place Eggs in a Single Layer
Carefully arrange your eggs in a single layer at the bottom of a saucepan. Avoid overcrowding, as this can lead to uneven cooking and potential cracking. A 2-quart saucepan is usually sufficient for 6-8 large eggs.
Step 3: Cover with Cold Water
Pour cold water over the eggs until they are submerged by about one inch. Starting with cold water allows the eggs to heat up gradually with the water, further reducing the risk of cracking and contributing to even cooking.
Step 4: Bring to a Rolling Boil
Place the saucepan on high heat and bring the water to a rapid, rolling boil. You'll see large, active bubbles breaking the surface.
Step 5: Turn Off Heat, Cover, and Let Sit
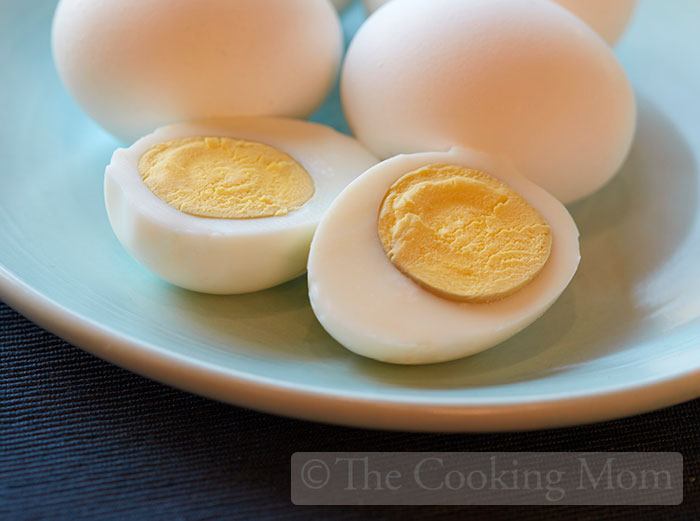
As soon as the water reaches a full rolling boil, immediately turn off the heat. Do NOT remove the pot from the burner; just turn off the heat source. Cover the pot tightly with a lid and let the eggs sit in the hot water for the recommended time. For perfect hard-boiled eggs with creamy yolks, let them sit for 9-12 minutes.
- 9 minutes: For a slightly jammy yolk, but still mostly set.
- 10-11 minutes: Our sweet spot for a firm, creamy, and vibrantly yellow hard-boiled yolk.
- 12 minutes: For a fully set, firm yolk that is still moist and delicious.
Adjust slightly for egg size (e.g., 8 minutes for medium, 12-13 minutes for jumbo).
Step 6: Transfer to an Immediate Ice Bath
Once the timer goes off, swiftly remove the eggs from the hot water using a slotted spoon and plunge them into a large bowl filled with ice water. This "ice bath" step is crucial! It immediately stops the cooking process, preventing overcooking and that dreaded green ring. It also helps the egg whites contract slightly, making the eggs significantly easier to peel. Let them cool in the ice bath for at least 5-10 minutes, or until completely chilled.
Step 7: Peel Under Cold Running Water
Once chilled, gently crack the eggs all around by tapping them on a hard surface. Roll them between your hands to loosen the shell further. For the easiest peeling experience, peel them under a gentle stream of cold running water, or directly in the ice bath. The water helps get under the membrane, allowing the shell to slide off smoothly.
Troubleshooting Common Hard-Boiled Egg Hurdles
Even with a perfect method, understanding common issues can help you refine your technique.
- Rubbery Whites / Dry, Crumbly Yolks: This is almost always a sign of overcooking. Reduce your sitting time in the hot water by a minute or two next time. Ensure your ice bath is truly cold and used immediately.
- Green Ring Around the Yolk: Another classic sign of overcooking. The ferrous sulfide reaction occurs when eggs are cooked too long or at too high a temperature. The ice bath is your best defense against this!
- Eggs are Hard to Peel: While fresh eggs can sometimes be trickier to peel, the most common reason for difficult peeling is insufficient or delayed cooling. The ice bath is non-negotiable for easy peeling. Make sure the eggs are fully chilled before attempting to peel.
- Cracked Shells During Cooking: Starting with room temperature eggs and using cold water to gradually heat them significantly reduces cracking. If eggs still crack, it could be due to extremely thin shells or being dropped too roughly into the pot.
Creative Ways to Enjoy Your Perfect Hard-Boiled Eggs
Now that you've mastered how to cook perfect hard boiled eggs every time, the culinary possibilities are endless!
- Classic Deviled Eggs: Their firm yet creamy yolks are ideal for a smooth, flavorful filling.
- Egg Salad: Mash them up for a delicious sandwich filling or scoop over greens.
- Salad Toppers: Slice or halve them to add protein and richness to any green salad, Cobb salad, or potato salad.
- Ramen or Noodle Bowls: A perfectly cooked hard-boiled egg elevates a simple bowl of noodles.
- Snacks: A hard-boiled egg is a convenient, protein-packed snack on its own, perhaps with a sprinkle of salt and pepper.
Conclusion
Mastering the perfect hard-boiled egg truly comes down to precision and understanding the egg's unique cooking needs. By following our seven-step method – from starting with room temperature eggs to the crucial ice bath – you'll consistently achieve beautifully cooked eggs with tender whites, creamy, vibrant yolks, and shells that peel away effortlessly. No more rubbery textures, no more green rings, and no more frustration. Embrace this technique, and you'll always know how to cook perfect hard boiled eggs every time, opening up a world of delicious possibilities for meals and snacks.
